For the complete documentation index, see llms.txt. This page is also available as Markdown.

Excel (XLSX)

This section helps you to generate dynamic Excel Spread Sheets.

Getting Started

You can use Excel Spread Sheets ( .xlsx is the supported format ) as your document template, you can build your document in Ms Excel, Google Sheets or other supporting platforms and then upload it to Docupilot as a .xlsx file. Replace the info in excel sheet like client name, client company name to {{client.name}} and {{client.company}}.

Excel Spread Sheet (.xlsx) template overview.

Uploading XLSX

Updating XLSX

If you want to make changes to your Excel Spread Sheet make changes in MS Excel, Google Sheets etc , and upload it to Docupilot as a .xlsx file.

Types of Merge Fields

Docupilot supports a variety of merge fields for you to use.

  • Tokens (Merge Field)

  • Condition (if-else)

  • Iterating inside a cell

  • Tables

Tokens (Merge Field)

These are simple fields embraced in {{}}. When you provide your custom data, Docupilot will replace these fields with the data. For example {{email}}, {{clientname}}, {{company_name}}.

If you want to group your fields you can use dot(.) while defining the tokens. For example your client has first name & last name, you can write the tokens as {{client.first_name}}, {{client.last_name}}.

Condition (if-else)

You can use conditional statements to show or hide contents based on your data. For example, If you are creating an invoice, you want to display CASH if the payment_mode is cash, else if the payment_mode is the card you want to show CARD.

To use conditional statement for checking inverse or negation of a condition, use the not in the condition. For example, to add an instruction requesting to add secure link if payment mode is not available on record:

Note: The if/else statements work only when added inside a single cell. For example:

You can use the conditional statements in the following ways

  • if

  • if-else

  • if-else if

  • if-else if-else

  • if-else if-else if

  • if-else if-else if-else

  • and so on...

Below are a few examples:

{{#if show_payment_details}}

ACH to {{acNumber}}

{{/if}}

prints the text ACH to xxxxxxxxx if show_payment_details is present and not false.

{{#if (payment_status == "paid")}}

payment cleared

{{/if}}

prints payment cleared if payment_status equals to "paid" (case-sensitive)

{{#if (payment_status != "paid")}}

unpaid

{{/if}}

prints unpaid if payment_status not equal to "paid" (case-sensitive)

{{#if (payment_status == "paid")}}

paid

{{else}}

unpaid

{{/if}}

prints paid if payment_status equals to "paid" otherwise prints unpaid

{{#if (payment_status == "paid")}}

paid

{{else if (payment_status == "initiated")}}

payment initiated

{{else}}

pending

{{/if}}

prints paid if payment_status equals to "paid"

prints payment initiated if payment_status equals to initiated

otherwise prints pending

{{#if (price > 1000)}}

good deal

{{/if}}

prints the text good deal if price is greater than 1000

{{#if (price >= 1000)}}

decent deal

{{/if}}

prints text decent deal if price is greater than or equal to 1000

{{#if (price < 1000)}}

small deal

{{/if}}

prints text small deal If price less than 1000

{{#if (price <= 1000)}}

okay-ish deal

{{/if}}

prints text okay-ish deal If price less than or equal to 1000

{{#if (payment_message contains "paid")}}

Payment is cleared {{/if}}

prints Payment is cleared if payment_message contains the text paid (for example, this invoice has been paid contains the text paid in it)

{{#if (payment_message not_contains "paid")}}

Payment is due {{/if}}

prints Payment is due if payment_message does not contain the text paid (for example, this invoice is not cleared does not contain the text paid in it)

{{#if (status == "open" or status == "on-hold")}}

Payment is pending

{{/if}}

prints Payment is pending if status is open OR on-hold

{{#if (status == "open" or status == "on-hold" or status == "under review")}}

Payment is pending

{{/if}}

prints Payment is pending if status is open OR on-hold OR under review

{{#if (status != "open" and status != "on-hold")}}

Payment is not pending

{{/if}}

prints Payment is not pending if status is not open AND not on-hold

{{#if (status == "open" and priority == "high")}}

High priority open task

{{/if}}

prints High priority open task if status is open AND if priority is high

{{#if (payment_status != "paid")}}Please Clear the Dues within 30 days

{{/if}}

prints Please Clear the Dues within 30 days if the payment_status is not equal to paid

{{#if (status in "open,pending")}}In Progress... Please stay tuned for further updates.

{{/if}}

prints In Progress... Please stay tuned for further updates. if status is sub-string of "open,pending"

Hiding Empty Sections & Lines

In the following example, when the address field has a value, it gives desired outcome. If the address is empty, it leaves an empty line in the output.

Data
Output

To hide empty lines, we should open the if condition in previous line or close it in next line. Here are examples on how the output will look like when street address is passed and when it is not:

Syntax
Data
Output

Iterating inside a cell

Multiple entries inside a cell can be incorporated by using the following syntax.

Iterating a list inside a cell in Excel
Output for iterating a list inside a cell in Excel

Tables

Dynamic tables allow a template to repeat a row for each item in a list, automatically adjusting during merging. Instead of setting a fixed number of rows, use loop tags {{#each ...}} ... {{/each}}. The result is a well-organized table—ideal for invoices, order summaries, schedules, or reports where record count changes.

Following are different ways in which a Dynamic Table can be created:

Simple Table

A simple and straight forward table which addresses most use-cases. To create a simple table which repeat one or many rows for each item in a list, follow these instructions:

  1. Identify the cell where table should start. (ex: B3)

  2. Identify number of columns that are to be repeated as part of the Dynamic Table. (ex: 3)

  3. Now, merge the number of cells starting from the start cell. (ex: Merge B3 -> D3)

  4. Add the loop's opening tag {{#each YOUR_TOKEN_NAME}} . (ex: {{#each invoice_items}} )

  5. In the next row, add the content for your columns.

    1. The content in each cell can be a dynamic placeholder (like {{name}}) or fixed text (like Item Name) or a combination (like Item Name: {{name}}).

    2. Formatters/Modifiers can be used to format or style dynamic data in a cell. (For example, adding {{upper name}} in B4 will display the names in uppercase.)

    3. For ex: consider an invoice invoice, where the item name, qty, and price are to be printed in 3 adjacent columns. Just {{name}} , {{quantity}}, and {{price}} in cells B4, C4 and D4

  6. If another row is to be repeated configure the next row as mentioned in 5.a. This can be done for as many rows as desired.

  7. Once the repeated rows are configured, in the next row merge the cells similar to what was done in step 3. (ex: Merge B5 -> D5)

    1. Merged cell width should be same as the number of columns that need to be repeated. This is also same as the width of the cell where loop's opening tag is added.

  8. Add the loop's closing tag {{/each}} in this merged cell (ex: add {{/each}} in merged cell B5)

Below is an example screenshot from an excel template which uses Dynamic table to print list of invoice line items. This example also demonstrates calculating the total price using aggregate modifier.

Inserting a Dynamic Table in Excel

Note that the loop's opening cell and closing cell should be merged and span across same number of columns. The cells sand-witched in between the opening cell and closing cell will be repeated. Cells to the left and to the right will not be disturbed by dynamic table.

Example output of a Dynamic Table in Excel

Nested Tables

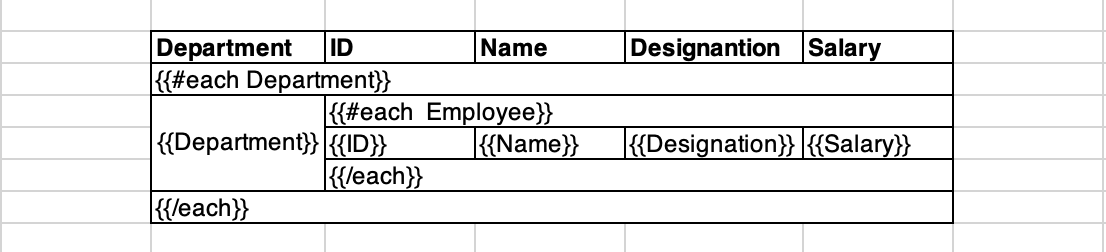
A Nested Table is more than 1 simple table nested inside one another. Nested tables allow you to repeat a nested list of items. For example, to print a list of Departments and Employee details in each Department.

To create a nested table, follow the same instructions as explained under Simple Tables. When configuring the cells after creating the opening cell, follow the same instructions atop to create a child dynamic table.

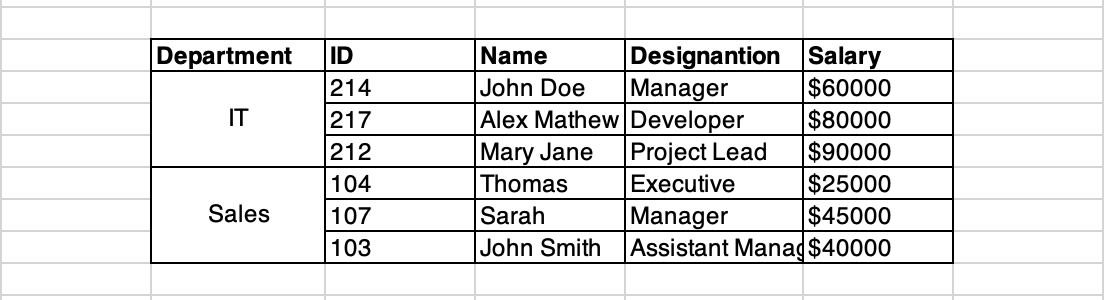
The image below depicts a Dynamic Table that iterates over a list of departments, prints the Department's name and then iterates over a list of Employees in each Department and prints their ID, Name, Designation and Salary.

Nested Dynamic Tables in Excel
Example output of a Nested Dynamic Tables in Excel

The example above shows Nested Dynamic tables with a 2 level nesting. There is currently no limit on the number of nesting levels supported.

Legacy Tables

This section acts as a reference for templates that use older Dynamic Table syntax. This syntax has many limitations and is not recommended for use.

Syntax: {{table:YOUR_LIST.PROPERTY_NAME}}

Example:

  • {{table:line_items.name}}

  • {{table:line_items.qty}}

  • {{table:line_items.amount}}

Here for the field named line_items – name, amount and qty are defined as the property of each line_item. The image below shows how this example looks like when implemented.

Legacy Dynamic Table in Excel
Example output of a Legacy Dynamic Table in Excel

Legacy tables are very limited in terms of functionality. The new style Dynamic Tables are flexible, scalable and are recommended over Legacy Dynamic Tables.

Inserting a dynamic image

This will be helpful if you want to insert dynamic image in the document.

Format : {{insert_image image1 width=width height=height max_width=max_width max_height=max_height}}

  • width (optional): Desired image width

  • height (optional): Desired image height

  • max_width (optional): Desired maximum width of the image

  • max_height (optional): Desired maximum height of the image

Example Usage

Syntax
Description

{{insert_image image1 width=300 height=200}}

The image inserted will be 300px wide and 200px tall

{{insert_image image1 width=300}}

Inserted image will be 300px wide, height will be auto adjusted based on the original image's aspect ratio. For example if original image is 600x500, inserted image will be 300x250.

{{insert_image image1 height=300}}

Inserted image will be 300px tall, width will be auto adjusted based on the original image's aspect ratio.

Constraining Image Dimensions

Use the max_width and max_height parameters to limit image dimensions.

Examples:

Syntax
Description

{{insert_image image1 max_width=300 max_height=300}}

The image will be resized to fit into a 350x350 box. Aspect ratio will be maintained. For example, if the original image is 900x600, the inserted image will be 300x200

{{insert_image image1 max_height=300}}

The image will be resized ensuring the height doesn't go beyond 300px. Aspect ratio will be maintained. For example, if the original image is 900x600, the inserted image will be 450x300

{{insert_image image1 max_width=300}}

The image will be resized ensuring the width doesn't go beyond 300px. Aspect ratio will be maintained. For example, if the original image is 900x600, the inserted image will be 300x200

{{insert_image image1 width=300 max_height=500}}

The image width will be set to 300px. If the resulting height exceeds 500px, the image will be scaled down proportionally so that the height does not exceed 500 px while maintaining its aspect ratio. For example, if original image is 400x1000, the inserted image will be 200x500

{{insert_image image1 height=500 max_width=400}}

The image height will be set to 500px. If the resulting width exceeds 400px, the image will be scaled down proportionally so that the width does not exceed 400px while maintaining its aspect ratio. For example, if the original image is 1200x900, the inserted image will be 400x300

The image URL need to be either publicly accessible so Docupilot can download and insert it in the document.

If you want to send only authenticated images, link your storage account like google drive, one drive, etc from Settings > Linked Accounts and enable Use For Images option if available. All image links sent to Docupilot will be downloaded using that authenticated account.

Adjust orientation for output PDF

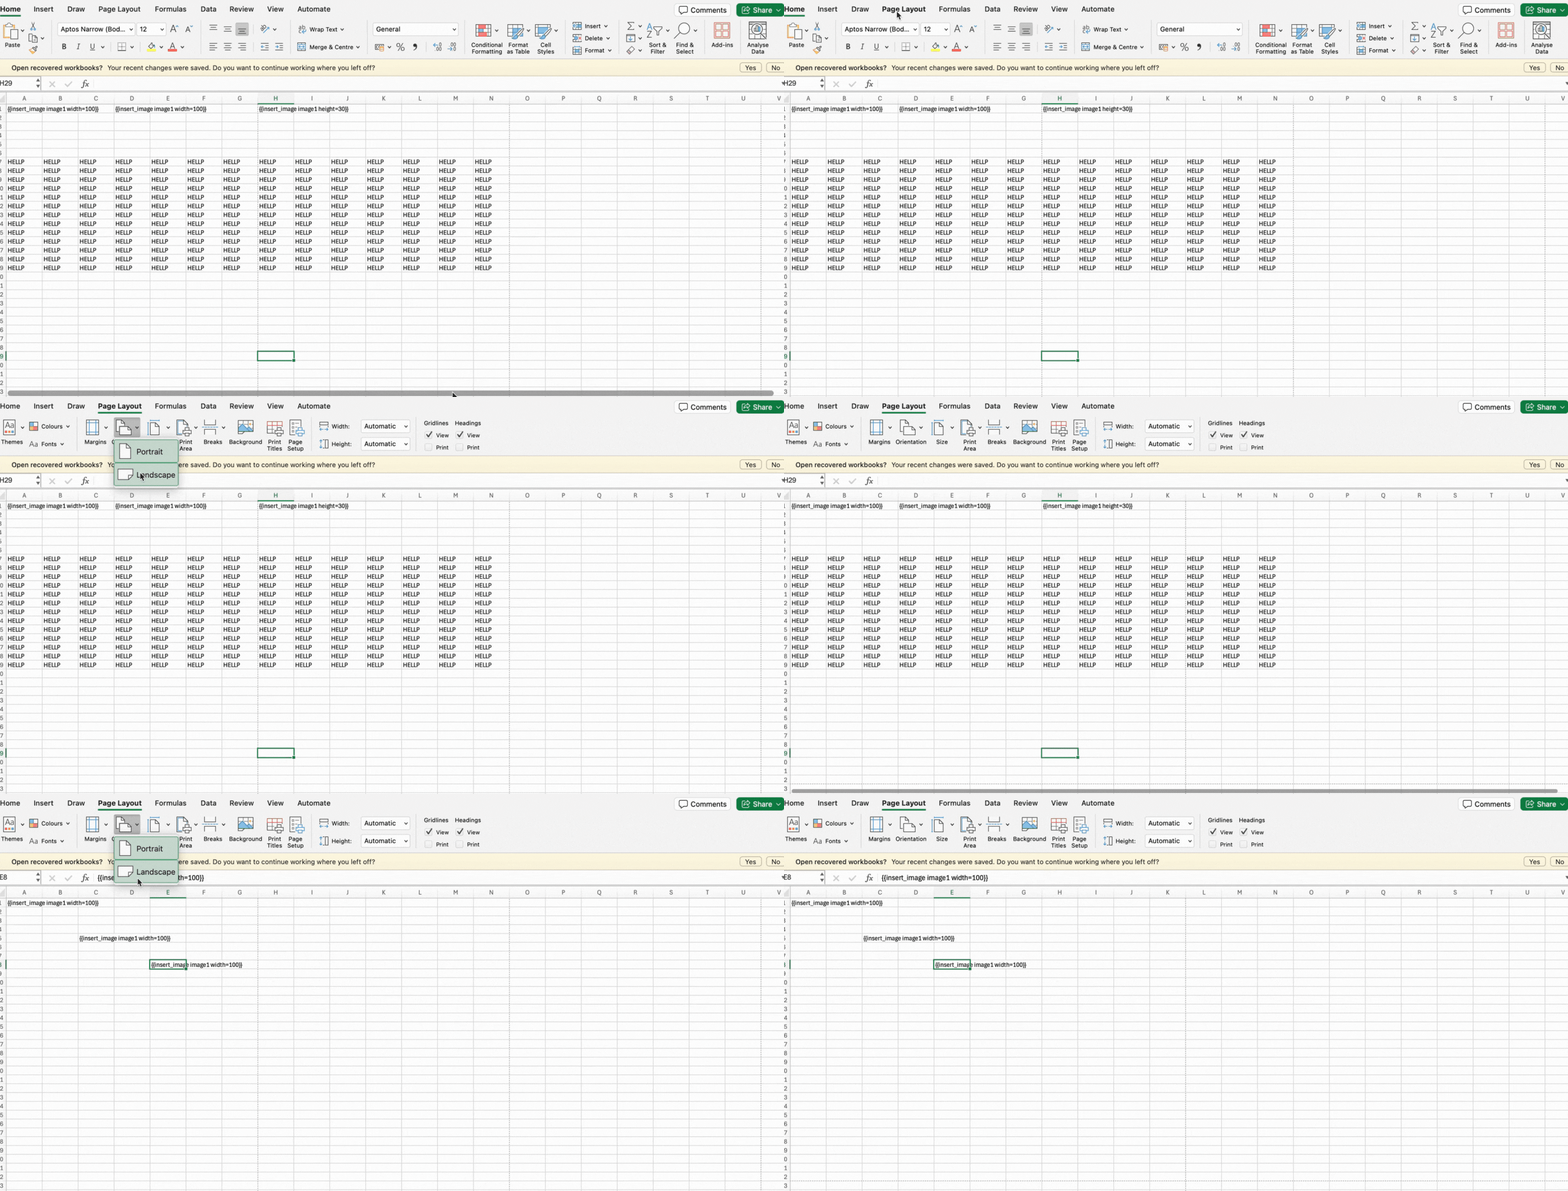
To generate a PDF in landscape mode from an XLSX template, follow these steps:

  1. Open your XLSX template and navigate to the 'Page Layout' settings.

  2. Select 'Page Orientation' and choose 'Landscape.'

  3. Upload the XLSX template to Docupilot, and the output will be in landscape format when converted to PDF.

Page Orientation updated on a XLSX file

Last updated

Was this helpful?